分类目录归档:Internet
socks proxy
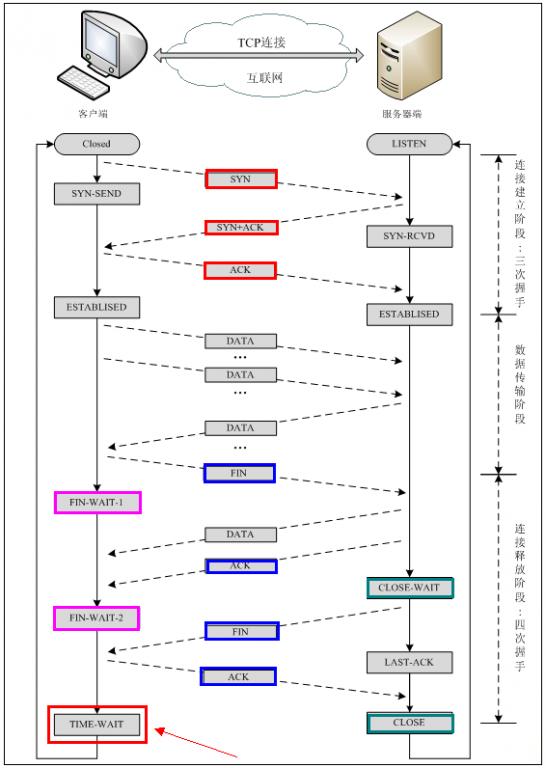
转:TCP协议中的三次握手和四次挥手
TLS handshake

Top Domain
Open Source UDP File Transfer Tool Comparison
Open Source UDP File Transfer Tool Comparison
February 3, 2016 Michael C 0 Comments
When it comes to Internet protocols, TCP has been the dominant protocol used across the web to form connections. TCP helps computers communicate by breaking large data sets into individual packets, transmitting them, and then reforming the packet in the original order once the data set has been received. But as file sizes grew and latency became an issue, User Datagram Protocol (UDP), gained more popularity. UDP picks up the slack by offering faster speeds with the ability to transmit much larger files, something that TCP isn’t capable of.
When comparing the architecture of the two protocol tools, the main difference is that UDP sends the packets without waiting for each connection to go through, which means lower bandwidth overhead and latency. TCP, on the other hand, sends the packets one at a time, in order, waiting to make sure each connection goes through before starting the next. To better understand the pros and cons of each protocol, below is a basic comparison of the two:
Feature
TCP UDP
Connection Connection-Oriented: messages navigate the internet one connection at a time Connectionless: a single program sends out a load of packets all at once.
Usage Used for application needing high reliability, where time is less relevant Used when applications need fast transmission
Used by other protocols HTTP, HTTPS, FTP, SMTP, Telnet DNS, DHCP, TFTP, SNMP, RIP, VOIP
Reliability All transferred data is guaranteed to arrive in order specified. No guarantee of arrival and ordering has to be managed by the application layer
Header Size 20 bytes 8 bytes
Data Flow Control Does flow control, requiring three packets to set up a socket connection before user data can be sent Does not have an option for flow control
Error Checking Yes Yes, but no recovery options
Acknowledgments Yes, required before next transfer will take place No, allows for quicker speed
There’s a clear tradeoff between the two when it comes to speed versus reliability, but as developments have been made with UDP, it’s become more and more trustworthy as a leading protocol tool. Recently, Google announced that they use their open source Google QUIC UDP-based protocol to run 50% of their Chrome traffic, with that percentage expecting to increase in the coming years. So as the market shifts and advancements continue to be made with the source code, UDP is quickly becoming the file transfer tool of the future. So what UDP should you use?
Choosing a UDP
When it comes to choosing a UDP there are two main options—buy it from a commercial service or install it for open source software. Given the immaturity of most open source software, it may not be as user friendly, but there are many options out there, so paying developers to manage and configure your UDP is not necessary.
Currently, there are six main UDP file transfer tools available as open source.
Tsunami UDP Protocol: Uses TCP control and UDP data for transfer over high speed long distance networks. It was designed specifically to offer more throughput than possible with TCP over the same networks.
UDT UDP-based Data Transfer: Designed to support global data transfer of terabyte sized data sets, using UDP to transfer the bulk of its data with reliability control mechanisms.
Enet: Main goal is to provide a thin, simple and robust network communication layer on top of UDP with reliable and ordered delivery of packets, which they accomplish by stripping it of higher level networking features.
UFTP: Specializes in distributing large files to a large number of receivers, especially when data distribution takes place over a satellite link, making TCP communication inefficient due to the delay. They have been used widely by The Wall Street Journal to send WSJ pages over satellite to their remote printing plants.
GridFTP: Unlike all others, GridFTP is based on FTP and is not UDP, but it can be used to solve the same problems experienced when using TCP.
Google QUIC: An experimental UDP-based network protocol designed at Google to support multiplexed connections between two endpoints, provide security protection equivalent to TSL/SSL, and reduce latency and bandwidth usage.
Below is a features comparison chart to better help you understand the side by side differences each system supports.
Tsunami
UDT
ENet
UFTP
GridFTP
Google QUIC
Multi-Threaded No No Yes No Yes Yes
Protocol Overhead 20% 10% NA ~10% 6-8%, same as TCP NA
Encryption No No No Yes Yes Yes
C++ source code Yes Yes Yes Yes Yes Yes
Java Source Code No Partial No No No No
Command Line No No No Yes Yes Yes
Distribution Packets Source code only Source code only Source Only Yes Yes Yes
UDP based point-to-point Yes Yes Yes Yes No Yes
Firewall Friendly No Partial, no auto-detection No Partial, no auto-detection No No, has had issues with stateful firewalls
Congestion Control Yes Yes NA Yes Yes, using TCP Yes
Automatic retry and resume No No Yes No, manual resume yes Yes Yes
Jumbo Packets No Yes No Yes, up to 8800 bytes Yes NA
Support for Packet Loss No No Yes No Yes Yes
Conclusion
When deciding what UDP tool to use, you have several factors to keep in mind. Many of issues arise when dealing with packet loss and recovery. For instance, UDT has been known to fail completely if even the slightest packet loss is reported, whereas Google QUIC has made significant advancements in addressing this issue. GridFTP might also not be the most user friendly, since it requires a much larger framework and orchestration to run, since it is not UDP-based. Considering all these factors intandem, hopefully you’ll be able to make a more informed decision when implementing UDP file transfer tools on your network.
SSL 3.0 POODLE
SSL/TLS协议的演化 10–安全问题 – SSLv3的POODLE攻击
发表回复
image
1.有趣的POODLE
POODLE是Padding Oracle On Downgraded Legacy Encryption的缩写,不知是巧合还是有意,在英文中Poodle的意思是贵宾犬,于是老外在写POODLE攻击相关文字的时候,用这种漂亮的小狗做配图。给人的感觉是,这小狗是SSL的吉祥物。
老外的一个习惯就是,无论做什么项目,都要事先起一个响亮的名字(伽利略计划之类)或者搞一个缩写(就像SSL)。POODLE既是缩写又是靓名,很容易就扬名天下了。这一招我们很快就学会了,例如百度凤巢的。
POODLE攻击是Google的研究员14年9月发现的,算是新攻击了,文档是【POODLE】。攻击的研究者也是2011年BEAST攻击的发现者。POODLE仅仅针对SSLv3,但它本质上和BEAST攻击很类似:
1.针对CBC模式块加密的缺陷。
2.目的是恢复cookie中的敏感信息
3.猜测的方式是一个byte一个byte的选择明文注入。
4.降维打击:利用POODLE缺陷,猜测n个byte需要发送的探测次数是O(n),即每个n byte需要256*n次。如果没有这种缺陷,仅仅bruteforce方式猜测,需要2^(8*n)次。
但操作更简单,而且没有像BEAST那样的workaround,只能升级协议。
2.攻击原理
POODLE仅仅针对SSLv3,而对TLS1.0无效,利用SSLv3加密块的Padding是随机值这一协议设计缺陷。
RFC6101 SSLv3的5.2.3.2定义了CBC块加密下的SSLv3加密块定义:
block-ciphered struct {
opaque content[SSLCompressed.length];
opaque MAC[CipherSpec.hash_size];————————————->1.对Padding部分没有完整性保护,这里MAC保护content,content length,sequence number。
uint8 padding[GenericBlockCipher.padding_length];————–>2.padding是随机的。看起来更不容被猜测到,实际上画蛇添足了。随机加上没有完整性保护,意味着无论这部分数据是什么内容,接收方都不会在意。
uint8 padding_length;
} GenericBlockCipher;
下面是一个可能的HTTP Post明文格式的例子,标为蓝色的path和body是上层应用或者说攻击者可以控制的数据:
“POS T /path C o o ki e : name=value… \ r\ n\ r\ nbody ‖ 20byte MAC ‖ padding”
假定加密后得到如下加密快,C1,C2到Cn,(C0是IV我们看不到),对于第i个加密块,处理的流程如下:
1.Pi = Dk(Ci) ⊕ Ci-1 –>其中k是密钥,Dk是解密函数,Pi是解密后的明文。
2.检查并移除Pn尾部的padding(Pn也可以完全是padding)。
3.检测并移除MAC,得到了明文。
攻击者希望通过选择明文注入,达到如下两个效果:
1.通过调整“path”的长度,使得cookie中尚未被猜测出来的字节位于上一个块的尾部(假设包括这个字节的加密块是Ci)。
2.然后调整“body”的长度,使得最后一个块(Cn)都是padding(也就是整个Post长度是block的整数倍)。
这显然是可以做到的。
之后攻击者保存Ci,替换最后的Cn,发送到Server。假设padding是随机填充的,只要计算之后最后一个字节碰撞成功,则整个报文可以正确发送出去。假设每个block是16字节,最后一个字节是Ci[15]。则
Dk(Ci)[15] ⊕ Cn-1[15] = 15 /*15是padding length*/
又根据前面的公式:
Pi = Dk(Ci) ⊕ Ci-1
则
15 ⊕ Cn1[15] ⊕ Ci-1[15] = Cn1[15] ⊕ Ci-1[15] ⊕ Dk(Ci)[15] ⊕ Cn-1[15] = Ci-1[15] ⊕ Dk(Ci)[15] = Pi[15]
—->这样就解出来最后一个字节
这里因为并不能保证每个数值尝试一次,只能说统计学上讲,256次尝试之后,会碰上一次。
3.防范措施 – TLS SCVS
定义了一个空的加密套件TLS_FALLBACK_SCSV {0x56, 0x00},如果Client这次用的版本号低于自己最高支持的版本好,必须携带这个信令。Client利用这个标记告诉Server,我因为上次连接失败,被你要求版本了。Server如果发现,自己没有降低Client的版本,则一定有中间人攻击,人为降低了前面Client发送的版本好,试图攻击。
什么时候这个扩展不管用:
1.有一方确实最高仅仅支持SSLv3。
2.有一方不支持这个扩展。
看到这种方法,我的第一反应是,如果中间人从两边的协商中全部剥离这个信令怎么办?后来想明白了,前几天被我认为狗血的Session Hash,这里起作用了。因为它检查所有发出去的握手报文的完整性,中间人无法欺骗了(待确认)。
还有一个问题是为什么不用标准扩展方式而用了一个特殊的加密套件这种Tricky的手段,后来也想明白了,TLS对这种攻击免疫,因此必须要SSLv3支持这种扩展,而又不能修改已有的SSLv3实现,用特殊加密套件这种方式来实现最少代码升级的扩展。
4.为什么TLS1.0可以免疫
我们看看TLS1.0协议的那一部分的改动解决了这个问题
RFC2246 TLS1.0里面相关数据结构没有变化,MAC依然无法保护padding,但是padding的内容有了规定:
“Each uint8 in the padding data vector must be filled with the padding length value.”
也就是,padding部分被填充成为padding length的值。假设padding有7byte,则连同padding length的8个bytes的内容是“7,7,7,7,7,7,7,7”,这样替换padding内容会被发现,攻击强度等同于暴力破解。
【参考】
1.POODLE, https://www.openssl.org/~bodo/ssl-poodle.pdf
2.BEAST,火狐浏览器分割HTTPS报文的问题,http://www.unclekevin.org/?p=38
3.TLS SCVS – TLS Fallback Signaling Cipher Suite Value (SCSV) for Preventing Protocol Downgrade Attacks,draft-ietf-tls-downgrade-scsv-05,https://datatracker.ietf.org/doc/draft-ietf-tls-downgrade-scsv/?include_text=1
本条目发布于2015年3月6日。属于SSL/TLS、安全、网络协议分类。
http://support.fortinet.com.cn/uploadfile/2015/0513/20150513020838240.pdf
SSL 3.0 POODLE SSL 3.0 POODLE SSL 3.0 POODLESSL 3.0 POODLE SSL 3.0 POODLE SSL 3.0 POODLE 漏洞
版本
1.0
时间
2015年4月
作者
张彦龙 (ylzhang@fortinet.com)
受影响的版本
FortiOS (4.3.X, 5.0.X, 5.2.X)
状态
草稿
1. 简介
1.1 SSL 3.0 poodle漏洞介绍
2014年10月15日,Google研究人员公布SSL 3.0协议存在一个非常严重的漏洞,该漏洞可被黑客用于截取浏览器与服务器之间进行传输的加密数据,如网银账号、邮箱账号、个人隐私等等。SSL 3.0的漏洞允许攻击者发起降级攻击,即欺骗浏览器说“服务器不支持更安全的安全传输层(TLS)协议”,然后强制其转向使用SSL 3.0,在强制浏览器采用SSL 3.0与服务器进行通讯之后,黑客就可以利用中间人攻击来解密HTTPs的cookies,Google将其称之为POODLE攻击,若受到POODLE 攻击,所有在网络上传输的数据将不再加密。目前已被TLS 1.0,TLS 1.1,TLS 1.2替代,因为兼容性原因,大多数的TLS实现依然兼容SSL3.0。
1.2 SSL 3.0 poodle攻击原理
为了通用性的考虑,目前多数浏览器版本都支持SSL3.0,TLS协议的握手阶段包含了版本协商步骤,一般来说,客户端和服务器端的最新的协议版本将会被使用。其在与服务器端的握手阶段进行版本协商的时,首先提供其所支持协议的最新版本,若该握手失败,则尝试以较旧的协议版本协商。能够实施中间人 攻击的攻击者通过使受影响版本浏览器与服务器端使用较新协议的协商的连接失败,可以成功实现降级攻击,从而使得客户端与服务器端使用不安全的SSL3.0 进行通信,此时,由于SSL 3.0使用的CBC块加密的实现存在漏洞,攻击者可以成功破解SSL连接的加密信息,比如获取用户cookie数据。这种攻击被称为POODL攻击 (Padding Oracle On Downgraded Legacy Encryption)。 此漏洞影响绝大多数SSL服务器和客户端,影响范围广泛。但攻击者如要利用成功,需要能够控制客户端和服务器之间的数据(执行中间人攻击)。通常用户的浏览器都使用新版本的安全协议与服务器进行连接,为了保持兼容性,当浏览器安全协议连接失败的时候, 就会转而尝试老版本的安全协议进行连接,其中就包括SSL 3.0。Poodle攻击的原理,就是黑客故意制造安全协议连接失败的情况,触发浏览器的降级使用 SSL 3.0,然后使用特殊的手段,从 SSL 3.0 覆盖的安全连接下提取到一定字节长度的隐私信息。
1.3 SSL协议要点
SSL协议由美国 NetScape公司开发的, 1996年发布了V3.0版本。SSL 3.0 已经存在 15 年之久,目前绝大多数浏览器都支持该版本。SSL3.0是已过时且不安全
的协议,SSL(Secure Sockets Layer 安全套接层)是一种基于Web应用的安全通信协议。 SSL介于TCP协议和应用层协议之间,主要作用就是将HTTP、FTP等应用层的数据进行加密然后依托可靠的TCP协议在互联网上传输到目的地,其中最典型的应用就是https。
1.4 SSL提供3个基本的安全服务:
1)身份合法性:数据发送方和接收方要确认彼此身份,要确保各自的身份不会被冒充。
2)数据机密性:所有传输的数据都进行加密,并且要确保即使数据被截获也无法破解。
3)数据完整性:确保收到的数据与发送方发出的数据一致,没有被篡改。
1.5 SSL协议主要采用的数据加密算法:
1)非对称加密算法:数据加密和解密使用不同的密钥,如RSA公钥加密算法。优点是安全级别高,很难被破解;缺点是加密解密的速度慢,因此只适用于小量数据的加密。SSL协议采用非对称加密算法实现数字签名,验证数据发送方(或接收方)的身份,同时也用非对称加密算法交换密钥(用于数据加密的对称加密算法的密钥,以及用于数据完整性验证的MAC算法)。
2)对称加密算法:数据加密和解密使用同一个密钥,如DES、3DES、RC4等都是对称加密算法。优点是加解密速度快,适用于大数据量的加密,但安全性较差。SSL协议采用对称加密算法对传输的数据进行加密。
3)MAC算法:Message Authentication Codes,即消息认证码算法,MAC含有密钥散列函数算法,兼容了MD和SHA算法的特性,并在此基础上加入了密钥。SSL协议采用MAC算法来检验消息的完整性。
VPS network speed test
wget –no-check-certificate -O speedtest-cli.py https://github.com/sivel/speedtest-cli/raw/master/speedtest_cli.py
python speedtest_cli.py
AdBlock Plus
https://adblockplus.org/zh_CN/filters
撰写Adblock Plus 过滤规则
当前的Adblock Plus版本允许你通过许多不同的方法来优化你的过滤规则。本文档描述了你可以使用的方法,并告诉你如果去使用它。
声明 :这里给出的所有的过滤规则只是例子而已,并不能直接使用。
AdBlock Plus 过滤规则介绍
基本过滤规则
通常你定义得最琐碎的过滤规则当然是阻挡banner 地址的。但是这些地址在你每次打开页面的时候都会 改变。例如:可能是http://example.com/ads/banner123.gif 。其中的123就是个随机的数字。所以 阻挡完整的图片网址没有效果,通常你需要更通用的过滤规则,例如http://example.com/ads/banner*.gif 甚至 http://example.com/ads/*
注意 :不要过多地使用通配符。过滤规则:http://example.com/* 虽然可以阻挡所有的banner , 但也会阻挡example.com 下其他一些你想看的内容。
定义例外规 则
有时你可能会发现某个过滤规则平时挡广告挡得很好,但在某些情况下,会阻挡不该挡的内容。 你不想移除这条过滤规则,但也不希望它阻挡不该挡的内容。
这就是例外规则的好处——它们允许 你定义过滤规则不被使用的情况。例如:当你对adv 规则阻挡了 http://example.com/advice.html 不 爽的时候,这时你就可以定义一条例外规则@@advice 。例外规则的写法与过滤规则完全一样,你可以使用通配符和正则表达式。你只需 要通过@@ 表明一个例外的规则。
例外规则可以处理得更多。如果一条例外规 则以http:// 或https:// (在前面加上管线符号(|))开始,这会使所有的页面都是例外。例如:如果你 的规则是@@|http://example.com ,你浏览http: //example.com 的页面 时,Adblock Plus对这个页面将会失效,这将不会阻挡任何东西。
匹配网址 开头/结尾
通常Adblock Plus处理过滤规则时,会自己假设在过滤规则的开头与结尾都有一个通配符,也就是说,ad 与*ad* 效果是一样 的。通常这并不会带来问题,但有时你可能想要设定可以匹配以网址开头或结尾的过滤规则。例如:你想要阻挡所有的Flash,如果你加入一条规则swf,阻 挡的将不只是以swf结尾的地址, http://www.example.com/swf/index.html 同样也会被阻挡。
要解决这个问题的办法就是:使用管线符号(|)来代表网址的最前端或最末端。例如:过滤规则swf| 会 阻挡 http://example.com/annoyingflash.swf 但不会阻挡http://example.com/swf/index.html 。 过滤规则|http://baddomain.example/ 会阻挡http://baddomain.example/banner.gif 而 不会阻挡http://gooddomain.example/analyze?http://baddomain.example 。
有时你想阻止http://example.com/banner.gif 和https://example.com/banner.gif 以 及 http://www.example.com/banner.gif 。这时只需把两个管线符号(|| )放到 过滤规则的域名前面。||example.com/banner.gif 会阻挡上面的地址,而不会阻挡http://badexample.com/banner.gif 或 者http://gooddomain.example/analyze?http://example.com/banner.gif (需 要 Adblock Plus 1.1 或更高版本).
标记分隔符
通常你需要接受过滤规则的任何分隔符。例如,你可能写这样的一个规则:阻挡http://example.com/ 和 http://example.com:8000/ 但是不阻挡http://example.com.ar/ 。 这里的符号()用作一个分隔符。{{{http://example.com }}} (需要的AdBlock加1.1或更高).
分隔符可以是除了– . %之外的任何字符或数字。这个地址的结尾也是作为一个分隔符下面的例子中所有的分隔符以红色标记出:http://example.com:8000/foo.bar?a=12&b=%D1%82%D0%B5%D1%81%D1%82 。 所以这个地址可以通过过滤规则^example.com^ 或者^%D1%82%D0%B5%D1%81%D1%82^ 或者^foo.bar^ 过滤
注释
任何以感叹号(!)开始的规则,都被视为注释。在过滤规则的列表中,仍然会显示这些规则,但会用灰色的字来显示,而不是黑色。 Adblock Plus在判断规则时,会忽略这些注释,所以我们可以写下任何我们想写的东西。你可以在一条规则上面写下这条规则是做什么用的。也可以在过滤列表的上方写 上作者信息(大多数过滤列表的作者已经这样做了)。
进阶功能
本章节描述的特性通常只有高级用户和维护过滤列表的作者才会看。一般使用者可以跳过。
指定过滤规则选项
Adblock Plus可以让你指定某些选项来改变某条规则的行为。你列举这些选项的时候将它们放在美元符号($)后面并用逗号(,)分割这些选项,放在过滤规则的最后 面。例如:
这里的*/ads/* 是真实的过滤规则,script 与match-case 是 它指定的选项。以下是目前支持的选项:
- 类型选项:判定过滤规则(或例外规则) 过滤元素的类型。过滤规则可以明确指定多种元素类型可以指定的类型包括:
- script —— 外部脚本,由HTML script标签加载
- image —— 一般图片,通常由 HTML 的 img 标签所载入
- background ——背景图片,通常用CSS指定
- stylesheet —— 外部CSS 样式表
- object —— 由浏览器插件处理的内容,例如Flash或Java
- xbl —— xbl绑定(通常由 -moz-binding CSS属性加载) 需要Firefox 3或更高版本
- ping pings 需要Firefox 3或更高版本
- XMLHttpRequest XMLHttpRequest 对 象 开始的请求 需要Firefox 3或更高版本
- object-subrequest —— 插件的请求,比如Flash 需要Firefox 3或更高版本
- dtd —— 通过XML文档加载的DTD文件 需要Firefox3或更高版本
- subdocument —— 内嵌的页面,通常通过HTML的框架方式内嵌
- document —— 网页本身(只有 例外规则 适用)
- other —— 其他不在上面的类型的请求,(在Firefox 2 中,这个包括XBL bindings, XMLHttpRequests )
- 反 转类型选项:指定过滤规则 不应用的元素类型。可以指定的类型选项: ~script, ~image, ~background, ~stylesheet, ~object, ~xbl, ~ping, ~xmlhttprequest, ~object-subrequest, ~dtd, ~subdocument, ~document, ~other
- third-party/first- party请求限制:如果指定third-party选项,则过滤规则只适用于来源与当前正在浏览的页面的不同的请求。类似地,~third-party 适用于来源与当前浏览页面相同的请求。
- 域名限制:domain= example.com 指过滤规则只适用于 了”example.com”下的页面。多个域名,可以用”|”分隔:过滤规则 domain=example.com|example.net 将 只适用于”example.com”或”example.net”的页面。如果一个域名是前面有”~”,则该规则不适用于这个域名的页面。例如,domain=~example.com 指 过滤规则适用于除了example.com 之外的任何域名的页面,但domain=example.com|~foo.example.com 限 制了过滤规则适用于”example.com”但是不包括”foo.example.com”。
- match-case —— 使过滤规则只适用于匹配地址,例如规则*/BannerAd.gif$match-case 将阻止http://example.com /BannerAd.gif 但是不阻止http://example.com/bannerad.gif 。
- collapse —— 这个选项将覆盖全局“折叠屏蔽元素”,并确过滤规则总是折叠元素。类似地,~collapse选项将确保过滤规则不折叠元素
使用正则表达式
如果你想更好地控制您的过滤规则,什么匹 配,什么不匹配,你可以使用正则表达式。例如过滤规则{{{/banner/d+/}}会匹配matchbanner123 和banner321 但 是不匹配banners 。您可以查看 正则表达式的文档 来学习如何写正则表达式。
注 :你 不应该 为了加快处理您的过滤列表而使用正则表达 式。你可能听过类似的说法,但其实那已经过时了。从 Adblock Plus 0.7 开始,基本过滤规则的处理已经比正规表达式快了。
元素隐藏
基本规则
有时你可能会发现无法阻挡某些内嵌在网页中的文字广告。如果查看源码的话,可能发现类似这样的代码:
<div

class
=
"textad"
>

    Cheapest tofu, only here and now!

<div>


<div

id
=
"sponsorad"
>

    Really cheap tofu, click here!

<div>


<textad>

    Only here you get the best tofu!

</textad>
因为你必须下载页面的内容,所以你也必须下载这些广告。对于这种情况,你可以做的就是-把这些广告藏起来,这样你就不会看到他 们了。这也就是元素隐藏的意义所在。
上面代码中的第一则广告是在一个class属性为 “textad”的div 容器内。过滤规则#div(textad) 可以把它给隐藏起来。这里的##表明这是一条定 义了元素隐藏的选择符的元素隐藏规则类似地,您可以通过他们的id属性隐藏属性, #div#sponsorad 将隐藏的第二广告。你 也可以不必指定元素名称,用#*(sponsorad) 也可以。你也可以仅指定要阻挡的元素名称来隐藏,例如:##textad 可 以阻挡第三则广告。
在不查看页面源码的情况下,Element Hiding Helper extension 帮助选择正确的元素并写出相应的规则基础的HTML知识还是很有用的。
注 : 元素隐藏规则与普通过滤规则的工作方式有很大的差别。元素隐藏规则不支持通配符。
隐藏元素:限定在特定域名的规则
通常你只想要隐藏特定网站的特定广告,而不希望规则会作用于其他网站。例如:#*(sponsor) 可 能会把某些网站的有效代码也隐藏了。但如果你把隐藏规则写成example.com##*(sponsor) ,这规则就只会作用在 http://example.com/ 与http://something.example.com/ ,但不作用在http://example.org/ 。 你也可以指定多个域名-只要用逗号(,)分隔即可,例如: domain1.example,domain2.example,domain3.example##*(sponsor)
如果在域名之前有“ ~ ” ,该规则将不 适 用于这个域名的页面。(需要的AdBlock加1.1或更高) 。例如, ~example.com##*.sponsor 将适用于出 了“example.com”之外的域名。 example.com|~foo.example.com##*.sponsor 适用于 “example.com”域名以及除了 “foo.example.com“外的字域名。
注 :由于元素隐藏实际实现的关系,你只可以将隐藏规则限制在完整的域名。你不能使用网址的 其他部份,也不可用 domain 代替domain.example,domain.test
注 :限制域名的元素隐藏规则也可用来隐藏浏览器的使用界面。例如, 过滤规则browser##menuitem#javascriptConsole 会隐藏Firefox的工具菜单上的JavaScript控制台。
属性选择符
一些广告隐藏起来并不容易——这些文字广告不仅没有id也没有class属性。你需要使用其他属性来隐藏这些广告,例如:##table[width=80%] 可 以隐藏拥有width属性值为80%的表格元素。如果你不想隐藏这个属性的所有值,##div[title*="adv"] 会隐藏所有title 属 性包含adv 字符的div 元素。你还可以检查属性的开始和结束字符。例如##div[title^="adv"][title$="ert"] 会 隐藏以adv开始并且以ert结束的div元素。正如你所见,你可以使用多个条件,table[width="80%"][bgcolor="white"] 会 隐藏宽度设为80% 、背景色(bgcolor)属性为白色的表格元素。
高 级选择符
一般情况下,Firefox支持的 CSS选择符都可用于元素隐藏。例如:下面的规则会隐藏跟在class 的属性为adheader 的div 元 素后的所有东西:##div.adheader + * 。完整的CSS列表请查阅W3C的CSS规范(Firefox目前并没有支持所 有的选择符)。
注 :这个功能是给高级使用者使用的,你可以通过CSS选择符很舒 服地去使用它。Adblock Plus 无法检查选择符的语法是否正确,如果你使用无效的 CSS 语法,你可能会破坏其他你已有的过滤规则。建议使用 JavaScript Console 检查是否有 CSS 错误。
简单元素隐藏语 法
Adblock Plus 只向后支持简单元素隐藏语法 (例如#div(id=foo) )。 使用这个语法是不好的,用CSS选择符才是首选。对这个语法的支持可能在以后的某个时间就不支持了。
Chain socks with http proxy upstream
Dante support both socks(socks4/socks5) and http proxy as upstream proxy.
logoutput: /var/log/sockd.log
internal: 0.0.0.0 port=1080
external: eth0
clientmethod: none
socksmethod: none
user.privileged: root
user.notprivileged: nobody
timeout.negotiate: 30
timeout.io: 86400
client pass {
from: 0.0.0.0/0 to: 0.0.0.0/0
log: connect error
}
socks pass {
from: 0.0.0.0/0 to: 0.0.0.0/0
log: connect error
protocol: tcp udp
}
route {
from: 0.0.0.0/0 to: 0.0.0.0/0 via: HTTP_PROXY_IP port = HTTP_PROXY_PORT
proxyprotocol: http
command: connect
protocol: tcp
method: none
}