2025/08/07 日全食


Note:
Bug still existed:
Widget of Twenty Eleven themes crash
Plugins
ADD:
[凹凸曼]微信分享有图
Duplicate Page or Post
Note:
UpdraftPlus – Backup/Restore dosen’t work for LFS system
Navidrome dosen’t support DSF/DFF decoding natively,
but it can be achieved via ffmpeg transcoding on the fly.
1 Enable transcoding in server side config file navidrome.toml:
FFmpegPath=”/opt/local/bin/ffmpeg”
EnableTranscodingConfig=”true”
2 Add flac transcode rule in Navidrome client (web browser):
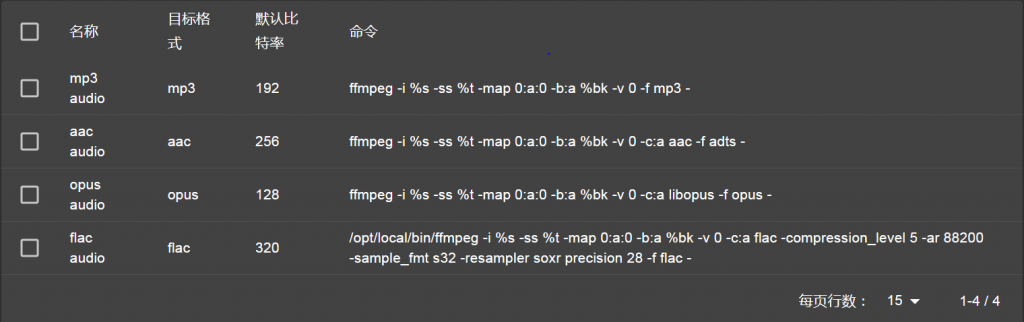
3 Select flac transcode in Tempo (Android client)
sudo cat /proc/sys/fs/inotify/max_user_watches
sudo sh -c “echo fs.inotify.max_user_watches=524288 >> /etc/sysctl.conf”
sudo sysctl -p
sudo cat /proc/sys/fs/inotify/max_user_watches
条件:
中国电信光猫, Openwrt 路由器, 阿里云域名
Step 1: 路由器升级, 最新版 OpenWrt / 23.05.03
Step 2: 从电信获得 宽带帐号/宽带密码
Step 3: 设置光猫为Bridge 模式
Step 4: 路由器 Lan 接口 IPv4 地址设置为 10.0.0.1
Step 5: 路由器 Wan 接口 修改为 PPPoE 模式, PAP/CHAP username/password 填入从电信获得的 宽带帐号/宽带密码
Step 6: 因为PPPoE 拨号会同时获得 IPv4 和 IPv6地址,wan6 接口没用,删除wan6接口
Step 7: 重起wan接口,会自动拨号,若成功,自动增加wan_6虚拟接口,IPv6 和IPv6-PD
Step 8: 修改Lan接口Advanced Setting:
Delegate IPv6 prefixes = yes
IPv6 assignment length = 60
IPv6 prefix filter = wan_6
Step 9: 修改路由器 network/dhcp/Static Leases, 为每个IPv6公网网卡增加一项纪录:
包括: Hostname, Mac 地址,IPv4,IPv6-Suffix,
为方便记忆,我选择 IPv4 最后一栏与IPv6-Suffix 相同,
比如,mpd IPv4=10.0.0.222, mpd的IPv6-Suffix 设置为0222
Step 10: 根据应用需要,修改基于端口的防火墙:Network/Firewall/TrafficRules 增加纪录
至此,路由器设置完毕
域名更新
由于每次拨号,都会获得一个不同的IPv6-PD值
可以使用脚本程序,监控路由器中的IPv6-PD值,若有变化,调用域名服务商的API接口,更新IPv6值
https://github.com/zhengleic/ddns-aliyun
存在问题:
发现重新拨号,IPv6-PD变化后,应用服务器可以自动获得新的IPv6,并访问外部网络,但无法从外部网络访问应用服务器
原因不详, 应用服务器为Debian 10
解决办法:
更新域名后,同时将应用服务器的网卡down/up一次: ifdown dev / ifup dev
Check :
/opt/local/bin/mysqlcheck -c piwigo piwigo_history -u root -p
Repair:
/opt/local/bin/mysqlcheck -r piwigo piwigo_history -u root -p
Note:
piwigo_history ==> Database table name
piwigo ==> Database name
Add a httpd audio output in mpd.conf, refer to https://jcorporation.github.io/myMPD/references/local-playback
# myMPD local playback
audio_output {
    type        "httpd"
    name        "HTTP Stream"
    encoder     "vorbis"
    port        "8000"
    quality     "10.0"
    format      "44100:16:1"
    always_on   "yes"
    tags        "yes"
}
Enable Local playback in mympd menu:
Settings/Features/Local playback/Enable
Launch browser, play the selected music by both:
play button: control the mpd play
local button: link to the httpd output
Test Environment:
mpd: v0.23.15
mympd: v14.1.1
server os: Ubuntu 18.04.1
client os: Android 13
client browse: chrome/firefox
Sometime, we need to bypass the firewall.
Suppose there are two linux box, a local box and a remote box, the local box unable to access some URL, due to the firewall limitation, while the remote box have no limitation.
We setup one tailscale vpn between these two nodes, as describe in https://tailscale.com/kb/1017/install
Now we config a exit node, to bypass the firewall of the local linux box.
Remore linux: Enable IP forward & Add exit-node:
sudo sed -i “s/#net.ipv4.ip_forward=1/net.ipv4.ip_forward=1/” /etc/sysctl.conf
sudo sed -i “s/#net.ipv6.conf.all.forwarding=1/net.ipv6.conf.all.forwarding=1/” /etc/sysctl.conf
sudo sysctl -p /etc/sysctl.confsudo tailscale up --advertise-exit-nodeTailscale admin webpage: Approve the exit node
Local linux:  Use exit-node:

sudo sed -i "s/#net.ipv4.conf.all.rp_filter=1/net.ipv4.conf.all.rp_filter=2/"  /etc/sysctl.conf


sudo sysctl -p /etc/sysctl.conf

sudo tailscale up --accept-routes --exit-node-allow-lan-access --exit-node=RemoteIP
Where RemoteIP is the vpn ip of remote node, say 100.113.189.45