
分类目录归档:Software
Rabbit algorithm
Rabbit is a synchronous stream cipher that was rst presented at the Fast
Software Encryption workshop in 2003
The algorithm and source code was released in 2008 as public domain software.
Rabbit was designed by Martin Boesgaard, Mette Vesterager, Thomas Pedersen, Jesper Christiansen and Ove Scavenius.
The authors of the cipher have provided a full set of cryptanalytic white papers on the Cryptico home page.[2] It is also described in RFC 4503
AdBlock Plus
https://adblockplus.org/zh_CN/filters
撰写Adblock Plus 过滤规则
当前的Adblock Plus版本允许你通过许多不同的方法来优化你的过滤规则。本文档描述了你可以使用的方法,并告诉你如果去使用它。
声明 :这里给出的所有的过滤规则只是例子而已,并不能直接使用。
AdBlock Plus 过滤规则介绍
基本过滤规则
通常你定义得最琐碎的过滤规则当然是阻挡banner 地址的。但是这些地址在你每次打开页面的时候都会 改变。例如:可能是http://example.com/ads/banner123.gif 。其中的123就是个随机的数字。所以 阻挡完整的图片网址没有效果,通常你需要更通用的过滤规则,例如http://example.com/ads/banner*.gif 甚至 http://example.com/ads/*
注意 :不要过多地使用通配符。过滤规则:http://example.com/* 虽然可以阻挡所有的banner , 但也会阻挡example.com 下其他一些你想看的内容。
定义例外规 则
有时你可能会发现某个过滤规则平时挡广告挡得很好,但在某些情况下,会阻挡不该挡的内容。 你不想移除这条过滤规则,但也不希望它阻挡不该挡的内容。
这就是例外规则的好处——它们允许 你定义过滤规则不被使用的情况。例如:当你对adv 规则阻挡了 http://example.com/advice.html 不 爽的时候,这时你就可以定义一条例外规则@@advice 。例外规则的写法与过滤规则完全一样,你可以使用通配符和正则表达式。你只需 要通过@@ 表明一个例外的规则。
例外规则可以处理得更多。如果一条例外规 则以http:// 或https:// (在前面加上管线符号(|))开始,这会使所有的页面都是例外。例如:如果你 的规则是@@|http://example.com ,你浏览http: //example.com 的页面 时,Adblock Plus对这个页面将会失效,这将不会阻挡任何东西。
匹配网址 开头/结尾
通常Adblock Plus处理过滤规则时,会自己假设在过滤规则的开头与结尾都有一个通配符,也就是说,ad 与*ad* 效果是一样 的。通常这并不会带来问题,但有时你可能想要设定可以匹配以网址开头或结尾的过滤规则。例如:你想要阻挡所有的Flash,如果你加入一条规则swf,阻 挡的将不只是以swf结尾的地址, http://www.example.com/swf/index.html 同样也会被阻挡。
要解决这个问题的办法就是:使用管线符号(|)来代表网址的最前端或最末端。例如:过滤规则swf| 会 阻挡 http://example.com/annoyingflash.swf 但不会阻挡http://example.com/swf/index.html 。 过滤规则|http://baddomain.example/ 会阻挡http://baddomain.example/banner.gif 而 不会阻挡http://gooddomain.example/analyze?http://baddomain.example 。
有时你想阻止http://example.com/banner.gif 和https://example.com/banner.gif 以 及 http://www.example.com/banner.gif 。这时只需把两个管线符号(|| )放到 过滤规则的域名前面。||example.com/banner.gif 会阻挡上面的地址,而不会阻挡http://badexample.com/banner.gif 或 者http://gooddomain.example/analyze?http://example.com/banner.gif (需 要 Adblock Plus 1.1 或更高版本).
标记分隔符
通常你需要接受过滤规则的任何分隔符。例如,你可能写这样的一个规则:阻挡http://example.com/ 和 http://example.com:8000/ 但是不阻挡http://example.com.ar/ 。 这里的符号()用作一个分隔符。{{{http://example.com }}} (需要的AdBlock加1.1或更高).
分隔符可以是除了– . %之外的任何字符或数字。这个地址的结尾也是作为一个分隔符下面的例子中所有的分隔符以红色标记出:http://example.com:8000/foo.bar?a=12&b=%D1%82%D0%B5%D1%81%D1%82 。 所以这个地址可以通过过滤规则^example.com^ 或者^%D1%82%D0%B5%D1%81%D1%82^ 或者^foo.bar^ 过滤
注释
任何以感叹号(!)开始的规则,都被视为注释。在过滤规则的列表中,仍然会显示这些规则,但会用灰色的字来显示,而不是黑色。 Adblock Plus在判断规则时,会忽略这些注释,所以我们可以写下任何我们想写的东西。你可以在一条规则上面写下这条规则是做什么用的。也可以在过滤列表的上方写 上作者信息(大多数过滤列表的作者已经这样做了)。
进阶功能
本章节描述的特性通常只有高级用户和维护过滤列表的作者才会看。一般使用者可以跳过。
指定过滤规则选项
Adblock Plus可以让你指定某些选项来改变某条规则的行为。你列举这些选项的时候将它们放在美元符号($)后面并用逗号(,)分割这些选项,放在过滤规则的最后 面。例如:
这里的*/ads/* 是真实的过滤规则,script 与match-case 是 它指定的选项。以下是目前支持的选项:
- 类型选项:判定过滤规则(或例外规则) 过滤元素的类型。过滤规则可以明确指定多种元素类型可以指定的类型包括:
- script —— 外部脚本,由HTML script标签加载
- image —— 一般图片,通常由 HTML 的 img 标签所载入
- background ——背景图片,通常用CSS指定
- stylesheet —— 外部CSS 样式表
- object —— 由浏览器插件处理的内容,例如Flash或Java
- xbl —— xbl绑定(通常由 -moz-binding CSS属性加载) 需要Firefox 3或更高版本
- ping pings 需要Firefox 3或更高版本
- XMLHttpRequest XMLHttpRequest 对 象 开始的请求 需要Firefox 3或更高版本
- object-subrequest —— 插件的请求,比如Flash 需要Firefox 3或更高版本
- dtd —— 通过XML文档加载的DTD文件 需要Firefox3或更高版本
- subdocument —— 内嵌的页面,通常通过HTML的框架方式内嵌
- document —— 网页本身(只有 例外规则 适用)
- other —— 其他不在上面的类型的请求,(在Firefox 2 中,这个包括XBL bindings, XMLHttpRequests )
- 反 转类型选项:指定过滤规则 不应用的元素类型。可以指定的类型选项: ~script, ~image, ~background, ~stylesheet, ~object, ~xbl, ~ping, ~xmlhttprequest, ~object-subrequest, ~dtd, ~subdocument, ~document, ~other
- third-party/first- party请求限制:如果指定third-party选项,则过滤规则只适用于来源与当前正在浏览的页面的不同的请求。类似地,~third-party 适用于来源与当前浏览页面相同的请求。
- 域名限制:domain= example.com 指过滤规则只适用于 了”example.com”下的页面。多个域名,可以用”|”分隔:过滤规则 domain=example.com|example.net 将 只适用于”example.com”或”example.net”的页面。如果一个域名是前面有”~”,则该规则不适用于这个域名的页面。例如,domain=~example.com 指 过滤规则适用于除了example.com 之外的任何域名的页面,但domain=example.com|~foo.example.com 限 制了过滤规则适用于”example.com”但是不包括”foo.example.com”。
- match-case —— 使过滤规则只适用于匹配地址,例如规则*/BannerAd.gif$match-case 将阻止http://example.com /BannerAd.gif 但是不阻止http://example.com/bannerad.gif 。
- collapse —— 这个选项将覆盖全局“折叠屏蔽元素”,并确过滤规则总是折叠元素。类似地,~collapse选项将确保过滤规则不折叠元素
使用正则表达式
如果你想更好地控制您的过滤规则,什么匹 配,什么不匹配,你可以使用正则表达式。例如过滤规则{{{/banner/d+/}}会匹配matchbanner123 和banner321 但 是不匹配banners 。您可以查看 正则表达式的文档 来学习如何写正则表达式。
注 :你 不应该 为了加快处理您的过滤列表而使用正则表达 式。你可能听过类似的说法,但其实那已经过时了。从 Adblock Plus 0.7 开始,基本过滤规则的处理已经比正规表达式快了。
元素隐藏
基本规则
有时你可能会发现无法阻挡某些内嵌在网页中的文字广告。如果查看源码的话,可能发现类似这样的代码:
<div

class
=
"textad"
>

    Cheapest tofu, only here and now!

<div>


<div

id
=
"sponsorad"
>

    Really cheap tofu, click here!

<div>


<textad>

    Only here you get the best tofu!

</textad>
因为你必须下载页面的内容,所以你也必须下载这些广告。对于这种情况,你可以做的就是-把这些广告藏起来,这样你就不会看到他 们了。这也就是元素隐藏的意义所在。
上面代码中的第一则广告是在一个class属性为 “textad”的div 容器内。过滤规则#div(textad) 可以把它给隐藏起来。这里的##表明这是一条定 义了元素隐藏的选择符的元素隐藏规则类似地,您可以通过他们的id属性隐藏属性, #div#sponsorad 将隐藏的第二广告。你 也可以不必指定元素名称,用#*(sponsorad) 也可以。你也可以仅指定要阻挡的元素名称来隐藏,例如:##textad 可 以阻挡第三则广告。
在不查看页面源码的情况下,Element Hiding Helper extension 帮助选择正确的元素并写出相应的规则基础的HTML知识还是很有用的。
注 : 元素隐藏规则与普通过滤规则的工作方式有很大的差别。元素隐藏规则不支持通配符。
隐藏元素:限定在特定域名的规则
通常你只想要隐藏特定网站的特定广告,而不希望规则会作用于其他网站。例如:#*(sponsor) 可 能会把某些网站的有效代码也隐藏了。但如果你把隐藏规则写成example.com##*(sponsor) ,这规则就只会作用在 http://example.com/ 与http://something.example.com/ ,但不作用在http://example.org/ 。 你也可以指定多个域名-只要用逗号(,)分隔即可,例如: domain1.example,domain2.example,domain3.example##*(sponsor)
如果在域名之前有“ ~ ” ,该规则将不 适 用于这个域名的页面。(需要的AdBlock加1.1或更高) 。例如, ~example.com##*.sponsor 将适用于出 了“example.com”之外的域名。 example.com|~foo.example.com##*.sponsor 适用于 “example.com”域名以及除了 “foo.example.com“外的字域名。
注 :由于元素隐藏实际实现的关系,你只可以将隐藏规则限制在完整的域名。你不能使用网址的 其他部份,也不可用 domain 代替domain.example,domain.test
注 :限制域名的元素隐藏规则也可用来隐藏浏览器的使用界面。例如, 过滤规则browser##menuitem#javascriptConsole 会隐藏Firefox的工具菜单上的JavaScript控制台。
属性选择符
一些广告隐藏起来并不容易——这些文字广告不仅没有id也没有class属性。你需要使用其他属性来隐藏这些广告,例如:##table[width=80%] 可 以隐藏拥有width属性值为80%的表格元素。如果你不想隐藏这个属性的所有值,##div[title*="adv"] 会隐藏所有title 属 性包含adv 字符的div 元素。你还可以检查属性的开始和结束字符。例如##div[title^="adv"][title$="ert"] 会 隐藏以adv开始并且以ert结束的div元素。正如你所见,你可以使用多个条件,table[width="80%"][bgcolor="white"] 会 隐藏宽度设为80% 、背景色(bgcolor)属性为白色的表格元素。
高 级选择符
一般情况下,Firefox支持的 CSS选择符都可用于元素隐藏。例如:下面的规则会隐藏跟在class 的属性为adheader 的div 元 素后的所有东西:##div.adheader + * 。完整的CSS列表请查阅W3C的CSS规范(Firefox目前并没有支持所 有的选择符)。
注 :这个功能是给高级使用者使用的,你可以通过CSS选择符很舒 服地去使用它。Adblock Plus 无法检查选择符的语法是否正确,如果你使用无效的 CSS 语法,你可能会破坏其他你已有的过滤规则。建议使用 JavaScript Console 检查是否有 CSS 错误。
简单元素隐藏语 法
Adblock Plus 只向后支持简单元素隐藏语法 (例如#div(id=foo) )。 使用这个语法是不好的,用CSS选择符才是首选。对这个语法的支持可能在以后的某个时间就不支持了。
Debian Dynamic DNS
http://perceptionistruth.com/2013/05/running-your-own-dynamic-dns-service-on-debian/
Running your own Dynamic DNS Service (on Debian)
I used to have a static IP address on my home ADSL connection, but then I moved to BT Infinity, and they don’t provide that ability. For whatever reason, my Infinity connection resets a few times a week, and it always results in a new IP address.
Since I wanted to be able to connect to a service on my home IP address, I signed up to dyn.com and used their free service for a while, using a CNAME with my hosting provider (Gandi) so that I could use a single common host, in my own domain, and point it to the dynamic IP host and hence, dynamic IP address.
While this works fine, I’ve had a few e-mails from dyn.com where either the update process hasn’t been enough to prevent the ’30 day account closure’ process, or in recent times, a mail saying they’re changing that and you now need to log in on the website once every 30 days to keep your account.
I finally decided that since I run a couple of VPSs, and have good control over DNS via Gandi, I may as well run my own bind9 service and use the dynamic update feature to handle my own dynamic DNS needs. Side note: I think Gandi do support DNS changes through their API, but I couldn’t get it working. Also, I wanted something agnostic of my hosting provider in case I ever move DNS in future (I’m not planning to, since I like Gandi very much).
The basic elements of this are,
- a bind9 service running somewhere, which can host the domain and accept the updates.
- delegation of a subdomain to that bind9 service. Since Gandi runs my top level domain for me, I need to create a subdomain and delegate to it, and then make dynamic updates into that subdomain. I can still use CNAMEs in the top level domain to hide the subdomain if I wish.
- configuration of the bind9 service to accept secure updates.
- a script to do the updates.
In the interests of not re-inventing the wheel, I copied most of the activity from this post. But I’ll summarise it here in case that ever goes away.
Installing / Configuring bind9
You’ll need somewhere to run a DNS (bind9 in my case) service. This can’t be on the machine with the dynamic IP address for obvious reasons. If you already have a DNS service somewhere, you can use that, but for me, I installed it on one of my Debian VPS machines. This is of course trivial with Debian (I don’t use sudo, so you’ll need to be running as root to execute these commands),
apt-get install bind9 bind9-doc
If the machine you’ve installed bind9 onto has a firewall, don’t forget to open ports 53 (both TCP and UDP). You now need to choose and configure your subdomain. You’ll be creating a single zone, and allowing dynamic updates.
The default config for bind9 on Debian is in /etc/bind, and that includes zone files. However, dynamically updated zones need a journal file, and need to be modified by bind. I didn’t even bother trying to put the file into /etc/bind, on the assumption bind won’t have write access, so instead, for dynamic zones, I decided to create them in /var/lib/bind. I avoided /var/cache/bind because the cache directory, in theory, is for transient files that applications can recreate. Since bind can’t recreate the zone file entirely, it’s not appropriate to store it there.
I added this section to /etc/bind/named.conf.local,
// Dynamic zone
  zone "home.example.com" {
    type master;
    file "/var/lib/bind/home.example.com";
    update-policy {
      // allow host to update themselves with a key having their own name
      grant *.home.example.com self home.example.com.;
    };
  };
This sets up the basic entry for the master zone on this DNS server.
Create Keys
So I’ll be honest, I’m following this section mostly by rote from the article I linked. I’m pretty sure I understand it, but just so you know. There are a few ways of trusting dynamic updates, but since you’ll likely be making them from a host with a changing IP address, the best way is to use a shared secret. That secret is then held on the server and used by the client to identify itself. The configuration above allows hosts in the subdomain to update their own entry, if they have a key (shared secret) that matches the one on the server. This stage creates those keys.
This command creates two files. One will be the server copy of the key file, and can contain multiple keys, the other will be a single file named after the host that we’re going to be updating, and needs to be moved to the host itself, for later use.
ddns-confgen -r /dev/urandom -q -a hmac-md5 -k thehost.home.example.com -s thehost.home.example.com. | tee -a /etc/bind/home.example.com.keys > /etc/bind/key.thehost.home.example.com
The files will both have the same content, and will look something like this,
key "host.home.example.com" {
algorithm hmac-md5;
secret "somesetofrandomcharacters";
};
You should move the file key.thehost.home.example.com to the host which is going to be doing the updating. You should also change the permissions on the home.example.com.keys file,
chown root:bind /etc/bind/home.example.com.keys
chmod u=rw,g=r,o= /etc/bind/home.example.com.keys
You should now return to /etc/bind/named.conf.local and add this section (to use the new key you have created),
// DDNS keys
include "/etc/bind/home.example.com.keys";
With all that done, you’re ready to create the empty zone.
Creating the empty Zone
The content of the zone file will vary, depending on what exactly you’re trying to achieve. But this is the one I’m using. This is created in /var/lib/bind/home.example.com,
$ORIGIN .
$TTL 300 ; 5 minutes
home.example.com IN SOA nameserver.example.com. root.example.com. (
    1 ; serial
    3600 ; refresh (1 hour)
    600 ; retry (10 minutes)
    604800 ; expire (1 week)
    300 ; minimum (5 minutes)
    )
NS nameserver.example.com.
$ORIGIN home.example.com.
In this case, namesever.example.com is the hostname of the server you’ve installed bind9 onto. Unless you’re very careful, you shouldn’t add any static entries to this zone, because it’s always possible they’ll get overwritten, although of course, there’s no technical reason to prevent it.
At this stage, you can recycle the bind9 instance (/etc/init.d/bind9 reload), and resolve any issues (I had plenty, thanks to terrible typos and a bad memory).
Delegation
You can now test your nameserver to make sure it responds to queries about the home.example.com domain. In order to properly integrate it though, you’ll need to delegate the zone to it, from the nameserver which handles example.com. With Gandi, this was as simple as adding the necessary NS entry to the top level zone. Obviously, I only have a single DNS server handling this dynamic zone, and that’s a risk, so you’ll need to set up some secondaries, but that’s outside the scope of this post. Once you’ve done the delegation, you can try doing lookups from anywhere on the Internet, to ensure you can get (for example) the SOA for home.example.com.
Making Updates
You’re now able to update the target nameserver, from your source host using the nsupdate command. By telling it where your key is (-k filename), and then passing it commands you can make changes to the zone. I’m using exactly the same format presented in the original article I linked above.
cat <<EOF | nsupdate -k /path/to/key.thehost.home.example.com
server nameserver.example.com
zone home.example.com.
update delete thehost.home.example.com.
update add thehost.home.example.com. 60 A 192.168.0.1
update add thehost.home.example.com. 60 TXT "Updated on $(date)"
send
EOF
Obviously, you can change the TTL’s to something other than 60 if you prefer.
Automating Updates
The last stage, is automating updates, so that when your local IP address changes, you can update the relevant DNS server. There are a myriad ways of doing this. I’ve opted for a simple shell script which I’ll run every couple of minutes via cron, and have it check and update DNS if required. In my instance, my public IP address is behind a NAT router, so I can’t just look at a local interface, and so I’m using dig to get my IP address from the opendns service.
This is my first stab at the script, and it’s absolutely a work in progress (it’s too noisy at the moment for example),
#!/bin/sh
# set some variables
host=thehost
zone=home.example.com
dnsserver=nameserver.example.com
keyfile=/home/bob/conf/key.$host.$zone
#
# get current external address
ext_ip=`dig +short @resolver1.opendns.com myip.opendns.com`
# get last ip address from the DNS server
last_ip=`dig +short @$dnsserver $host.$zone`
if [ ! -z “$ext_ip” ]; then
if [ ! -z “$last_ip” ]; then
if [ “$ext_ip” != “$last_ip” ]; then
echo “IP addresses do not match (external=$ext_ip, last=$last_ip), sending an update”
cat <
http://www.foell.org/justin/diy-dynamic-dns-with-openwrt-bind/
http://blog.infertux.com/2012/11/25/your-own-dynamic-dns/
http://idefix.net/~koos/dyndnshowto/dyndnshowto.html
https://blog.hqcodeshop.fi/archives/76-Doing-secure-dynamic-DNS-updates-with-BIND.html
https://0x2c.org/rfc2136-ddns-bind-dnssec-for-home-router-dynamic-dns/
http://agiletesting.blogspot.com/2014/12/dynamic-dns-updates-with-nsupdate-new.html
转:Android布局优化利器include和ViewStub
http://www.codeceo.com/article/android-include-viewstub.html
当创建复杂的布局的时候,有时候会发现添加了很多的ViewGroup和View。随之而来的问题是View树的层次越来越深,应用也变的越来越慢,因为UI渲染是非常耗时的。
这时候就应该进行布局优化了。这里介绍两种方式,分别为<include>标签和ViewStub类。
<include/>
使用<include/>是为了避免代码的重复。设想一种情况,我们需要为app中的每个视图都添加一个footer,这个 footer是一个显示app名字的TextView。通常多个Activity对应多个XML布局文件,难道要把这个TextView复制到每个XML 中吗?如果TextView需要做修改,那么每个XML布局文件都要进行修改,那简直是噩梦。
面向对象编程的其中一个思想就是代码的复用,那么怎么进行布局的复用呢?这时,<include/>就起作用了。
如果学过C语言,那么对#include应该不陌生,它是一个预编译指令,在程序编译成二进制文件之前,会把#include的内容拷贝到#include的位置。
Android中的<include/>也可以这么理解,就是把某些通用的xml代码拷贝到<include/>所在的地方。以一个Activity为例。
<RelativeLayout xmlns:android="http://schemas.android.com/apk/res/android" android:layout_width="fill_parent"
    android:layout_height="fill_parent" >
    <TextView
        android:layout_width="fill_parent"
        android:layout_height="wrap_content"
        android:layout_centerInParent="true"
        android:gravity="center_horizontal"
        android:text="@string/hello" />

    <include layout="@layout/footer_with_layout_properties"/>

</RelativeLayout>
footer_with_layout_properties.xml中就是一个简单的TextView,代码如下:
<TextView xmlns:android="http://schemas.android.com/apk/res/android"
    android:layout_width="fill_parent"
    android:layout_height="wrap_content"
    android:layout_alignParentBottom="true"
    android:layout_marginBottom="30dp"
    android:gravity="center_horizontal"
    android:text="@string/footer_text" />
上述的代码中,我们使用了<include/>标签,达到了代码复用的目的。
但是,仍然存在一些疑惑。
footer_with_layout_properties.xml中使用了android:layout_alignParentBottom属性,这个属性之所以可行,是因为外层布局是RelativeLayout。
那么,如果外层布局换做LinearLayout又会怎样呢?答案显而易见,这肯定是行不通的。那么怎么办呢?我们可以把具体的属性写在<include/>标签里面,看下面的代码。
<RelativeLayout xmlns:android="http://schemas.android.com/apk/res/android" android:layout_width="fill_parent"
    android:layout_height="fill_parent">
    <TextView
        android:layout_width="fill_parent"
        android:layout_height="wrap_content"
        android:layout_centerInParent="true"
        android:gravity="center_horizontal"
        android:text="@string/hello"/>
    <include
        layout="@layout/footer"
        android:layout_width="fill_parent"
        android:layout_height="wrap_content"
        android:layout_alignParentBottom="true"
        android:layout_marginBottom="30dp"/>
</RelativeLayout>
我们直接在<include/>标签里面使用了android:layout_*属性。
注意:如果想要在<include/>标签中覆盖被包含布局所指定的任何android:layout_*属性,必须 在<include/>标签中同时指定layout_width和layout_height属性,这可能是一个Android系统的一个 bug吧。
ViewStub
在开发过程中,难免会遇到各种交互问题,例如显示或隐藏某个视图。如果想要一个视图只在需要的时候显示,可以尝试使用ViewStub这个类。
先看一下ViewStub的官方介绍:
“ViewStub是一个不可视并且大小为0的视图,可以延迟到运行时填充布局资源。当ViewStub设置为Visible或调用inflate()之后,就会填充布局资源,ViewStub便会被填充的视图替代”。
现在已经清楚ViewStub能干什么了,那么看一个例子。一个布局中,存在一个MapView,只有需要它的时候,才让它显示出来。
<RelativeLayout xmlns:android="http://schemas.android.com/apk/res/android"
    android:layout_width="fill_parent"
    android:layout_height="fill_parent" >

    <Button
        android:layout_width="fill_parent"
        android:layout_height="wrap_content"
        android:layout_gravity="center_vertical"
        android:onClick="onShowMap"
        android:text="@string/show_map" />

    <ViewStub
        android:id="@+id/map_stub"
        android:layout_width="fill_parent"
        android:layout_height="fill_parent"
        android:inflatedId="@+id/map_view"
        android:layout="@layout/map" />

</RelativeLayout>
map.xml文件中包含一个MapView,只有在必要的时候,才会让它显示出来。
<com.google.android.maps.MapView xmlns:android="http://schemas.android.com/apk/res/android"
    android:id="@+id/map_view"
    android:layout_width="fill_parent"
    android:layout_height="fill_parent"
    android:apiKey="my_api_key"
    android:clickable="true" />
另外,inflatedId是ViewStub被设置成Visible或调用inflate()方法后返回的id,这个id就是被填充的View的id。在这个例子中,就是MapView的id。
接下来看看ViewStub是怎么使用的。
public class MainActivity extends MapActivity {

  private View mViewStub;

  @Override
  public void onCreate(Bundle savedInstanceState) {
    super.onCreate(savedInstanceState);
    setContentView(R.layout.main);
    mViewStub = findViewById(R.id.map_stub);
  }

  public void onShowMap(View v) {
    mViewStub.setVisibility(View.VISIBLE);
  }

  @Override
  protected boolean isRouteDisplayed() {
    return false;
  }
}
题外话
有的同学肯定会问,使用ViewStub和单纯地把View设置为View.GONE或View.VISIBLE有什么区别呢?不都是显示和隐藏吗,使用ViewStub反而更麻烦了。
确实是有区别的,会涉及到View树的渲染,内存消耗等。
至于有什么具体的差别,就请大家自己去Google吧。俗话说,自己动手,丰衣足食嘛!
参考资料
http://code.google.com/p/android/issues/detail?id=2863
http://android-developers.blogspot.com.ar/2009/03/android-layout-tricks-3-optimize-with.html
http://developer.android.com/reference/android/view/ViewStub.html
Putting Your APKs on Diet
http://cyrilmottier.com/2014/08/26/putting-your-apks-on-diet/
It’s no secret to anyone, APKs out there are getting bigger and bigger. While simple/single-task apps were 2MB at the time of the first versions of Android, it is now very common to download 10 to 20MB apps. The explosion of APK file size is a direct consequence of both users expectations and developers experience acquisition. Several reasons explain this dramatic file size increase:
- The multiplication of dpi categories ([l|m|tv|h|x|xx|xxx]dpi)
- The evolution of the Android platform, development tools and the libraries ecosystem
- The ever-increasing users’ expectations regarding high quality UIs
- etc.
Publishing light-weight applications on the Play Store is a good practice every developer should focus on when designing an application. Why? First, because it is synonymous with a simple, maintainable and future-proof code base. Secondly, because developers would generally prefer staying below the Play Store current 50MB APK limit rather than dealing with download extensions files. Finally because we live in a world of constraints: limited bandwidth, limited disk space, etc. The smaller the APK, the faster the download, the faster the installation, the lesser the frustration and, most importantly, the better the ratings.
In many (not to say all) cases, the size growth is mandatory in order to fulfill the customer requirements and expectations. However, I am convinced the weight of an APK, in general, grows at a faster pace than users expectations. As a matter of fact, I believe most apps on the Play Store weight twice or more the size they could and should. In this article, I would like to discuss about some techniques/rules you can use/follow to reduce the file size of your APKs making both your co-workers and users happy.

The APK file format
Prior to looking at some cool ways to reduce the size of our apps, it is mandatory to first understand the actual APK file format. Put simply, an APK is an archive file containing several files in a compressed fashion. As a developer, you can easily look at the content of an APK just by unzipping it with the unzip command. Here is what you usually get when executing unzip <your_apk_name>.apk1:
1 2 3 4 5 6 7 8 9 10 11 12 13 14 |
|
Most of the directories and files shown above should look familiar to developers. They mostly reflect the project structure observed during the design & development process: /assets, /lib, /res, AndroidManifest.xml. Some others are quite exotic at first sight. In practice, classes.dex, contains the dex compiled version of you Java code while resources.arsc includes precompiled resources e.g. binary XML (values, XML drawables, etc.).
Because an APK is a simple archive file, it means it has two different sizes: the compressed file size and the uncompressed one. While both sizes are important, I will mainly focus on the compressed size in this article. In fact, a great rule of thumb is to consider the size of the uncompressed version to be proportional to the archive: the smaller the APK, the smaller the uncompressed version.
Reducing APK file size
Reducing the file size of an APK can be done with several techniques. Because each app is different, there is no absolute rule to put an APK on diet. Nevertheless, an APK consists of 3 significant components we can easily act on:
- Java source code
- resources/assets
- native code
The tips and tricks below all consist on minimizing the amount of space used per component reducing the overall APK size in the process.
Have a good coding hygiene
It probably seems obvious but having a good coding hygiene is the first step to reducing the size of your APKs. Know your code like the back of one’s hand. Get rid of all unused dependency libraries. Make it better day after day. Clean it continuously. Focusing on keeping a clean and up-to-date code base is generally a great way to produce small APKs that only contain what is strictly essential to the app.
Maintaining an unpolluted code base is generally easier when starting a project from scratch. The older the project is, the harder it is. As a fact, projects with a large historical background usually have to deal with dead and/or almost useless code snippets. Fortunately some development tools are here to help you do the laundry…
Run Proguard
Proguard is an extremely powerful tool that obfuscates, optimizes and shrinks your code at compile time. One of its main feature for reducing APKs size is tree-shaking. Proguard basically goes through your all of your code paths to detect the snippets of code that are unused. All the unreached (i.e. unnecessary) code is then stripped out from the final APK, potentially radically reducing its size. Proguard also renames your fields, classes and interfaces making the code as light-weight as possible.
As you may have understood, Proguard is extremely helpful and efficient. But with great responsibilities comes great consequences. A lot of developers consider Proguard as an annoying development tool because, by default, it breaks apps heavily relying on reflection. It’s up to developers to configure Proguard to tell it which classes, fields, etc. can be processed or not.
Use Lint extensively
Proguard works on the Java side. Unfortunately, it doesn’t work on the resources side. As a consequence, if an image my_image in res/drawable is not used, Proguard only strips it’s reference in the R class but keeps the associated image in place.
Lint is a static code analyzer that helps you to detect all unused resources with a simple call to ./gradlew lint. It generates an HTML-report and gives you the exhaustive list of resources that look unused under the “UnusedResources: Unused resources” section. It is safe to remove these resources as long as you don’t access them through reflection in your code.
Lint analyzes resources (i.e. files under the /res directory) but skips assets (i.e. files under the /assets directory). Indeed, assets are accessed through their name rather than a Java or XML reference. As a consequence, Lint cannot determine whether or not an asset is used in the project. It is up to the developer to keep the /assets folder clean and free of unused files.
Be opinionated about resources
Android supports a very large set of devices at its core. In fact, Android has been designed to support devices regardless of their configuration: screen density, screen shape, screen size, etc. As of Android 4.4, the framework natively supports various densities: ldpi, mdpi, tvdpi, hdpi, xhdpi, xxhdpi and xxxhdpi. Android supporting all these densities doesn’t mean you have to export your assets in each one of them.
Don’t be afraid of not bundling some densities into your application if you know they will be used by a small amount of people. I personally only support hdpi, xhdpi and xxhdpi2 in my apps. This is not an issue for devices with other densities because Android automatically computes missing resources by scaling an existing resource.
The main point behind my hdpi/xhdpi/xxhdpi rule is simple. First, I cover more than 80% of my users. Secondly xxxhdpi exists just to make Android future-proof but the future is not now (even if it’s coming very quickly…). Finally I actually don’t care about the crappy/low-res densities such as mdpi or ldpi. No matter how hard I work on these densities, the result will look as horrible as letting Android scaling down the hdpi variant.
On a same note, having a single variant of an image in drawable-nodpi also can save you space. You can afford to do that if you don’t think scaling artifacts are outrageous or if the image is displayed very rarely throughout the app on day-to-day basis.
Minimize resources configurations
Android development often relies on the use of external libraries such as Android Support Library, Google Play Services, Facebook SDK, etc. All of theses libraries comes with resources that are not necessary useful to your application. For instance, Google Play Services comes with translations for languages your own application don’t even support. It also bundles mdpi resources I don’t want to support in my application.
Starting Android Gradle Plugin 0.7, you can pass information about the configurations your application deals with to the build system. This is done thanks to the resConfig and resConfigs flavor and default config option. The DSL below prevents aapt from packaging resources that don’t match the app managed resources configurations:
1 2 3 4 5 6 |
|
Compress images
Aapt comes with a lossless image compression algorithm. For instance, a true-color PNG that does not require more than 256 colors may be converted to an 8-bit PNG with a color palette. While it may reduce the size of your resources, it shouldn’t prevent you from embracing the lossy PNG preprocessor optimization path. A quick Google search yields several tools such as pngquant, ImageAlpha or ImageOptim. Just pick the one that best fits your designer workflow and requirements and use it!
A special type of Android-only images can also be minimized: 9-patches. As far as I know, no tools have been specifically created for this. However, this can be done fairly easily just by asking your designer to reduce the stretchable and content areas to a minimum. In addition to optimizing the asset weight, it will also make the assets maintenance way easier in the long term.
Limit the number of architectures
Android is generally about Java but there are some rare cases where applications need to rely on some native code. Just like you should be opinionated about resources, you should too when it comes to native code. Sticking to armabi and x86 architecture is usually enough in the current Android eco-system. Here is an excellent article about native libraries weight reduction.
Reuse whenever possible
Reusing stuff is probably one of the first important optimization you learn when starting developing on mobile. In a ListView or a RecyclerView, reusing helps you keep a smooth scrolling performance. But reusing can also help you reduce the final size of your APK. For instance, Android provides several utilities to re-color an asset either using the new android:tint and android:tintMode on Android L or the good old ColorFilter on all versions.
You can also prevent packaging resources that are only a rotated equivalent of another resource. Let’s say you have 2 images named ic_arrow_expand and ic_arrow_collapse :
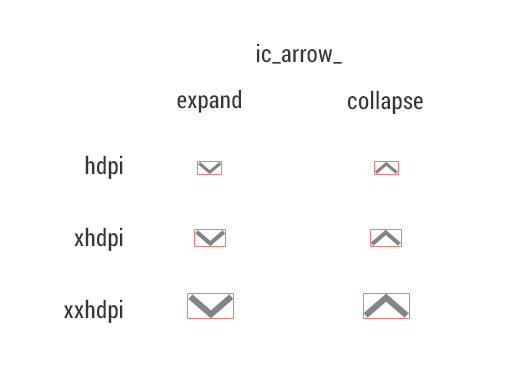
You can easily get rid of ic_arrow_collapse by creating a RotateDrawable relying on ic_arrow_expand. This technique also reduces the amount of time your designer requires to maintain and export the collapsed asset variant:
1 2 3 4 5 6 7 |
|
Render in code when appropriate
In some cases rendering graphics directly for the Java code can have a great benefit. One of the best example of a mammoth weight gain is with frame-by-frame animations. I’ve been struggling with Android Wear development recently and had a look at the Android wearable support library. Just like the regular Android support library, the wearable variant contains several utility classes when dealing with wearable devices.
Unfortunately, after building a very basic “Hello World” example, I noticed the resulting APK was more than 1.5MB. After a quick investigation into wearable-support.aar, I discovered the library bundles 2 frame-by-frame animations in 3 different densities: a “success” animation (31 frames) and an “open on phone” animation (54 frames).

The frame-by-frame success animation is built with a simple AnimationDrawable defined in an XML file:
1 2 3 4 5 6 7 8 9 10 11 12 13 14 15 16 17 18 19 20 21 22 23 24 25 |
|
The good point is (I’m being sarcastic of course) that each frame is displayed for a duration of 33ms making the animation run at 30fps. Having a frame every 16ms would have ended up with a library twice larger… It gets really funny when you continue digging in the code. The generic_confirmation_00175 frame (line 15) is displayed for a duration of 333ms. generic_confirmation_00185 follows it. This is a great optimization that saves 9 similar frames (176 to 184 included) from being bundled into application. Unfortunately, I was totally disappointed to see that wearable-support.aar actually contains all of these 9 completely unused and useless frames in 3 densities.3
Doing this animation in code obviously requires development time. However, it may dramatically reduce the amount of assets in your APK while maintaining a smooth animation running at 60fps.. At the time of the writing, Android doesn’t provide a easy tool to render such animations. But I really hope Google is working on a new light-weight real-time rendering system to animate all of these tiny details that material design is so fond of. An “Adobe After Effect to VectorDrawable” designer tool or equivalent would help a lot.
Going even further ?
All of the techniques described above mainly target the app/library developers side. Could we go further if we had total control over the distribution chain? I guess we could but that would mainly involve some work server-side or more specifically Play Store-side. For instance, we could imagine a Play Store packaging system that bundles only the native libraries required for the target device.
On a similar note, we could imagine only packaging the configuration of the target device. Unfortunately that would completely break one of the most important functionalities of Android: configuration hot-swapping. Indeed, Android has always been designed to deal with live configuration changes (language, orientation, etc.). For instance, removing resources that are not compatible with the target screen density would be a great benefit. Unfortunately, Android apps are able to deal on the fly with a screen density change. Even though we could imagine deprecating this capability, we would still have to deal with drawables defined for a different density than the target density as well as those having more than a single density qualifier (orientation, smallest width, etc.).
Server-side APK packaging looks extremely powerful. But is is also very risky because the final APK delivered to the user would be completely different from the one sent to the Play Store. Delivering an APK with some missing resources/assets would just break apps.
Conclusion
Designing is all about getting the best out of a set of constraints. The weight of an APK file is clearly one of these constraints. Don’t be afraid of pulling the strings out of one apsect of your application to make some other better in some ways. For instance, do not hesitate to reduce the quality of the UI rendering if it reduce the size of the APK and make the app smoother. 99% of your users won’t even notice the quality drop while they will notice the app is light-weight and smooth. After all, your application is judged as a whole, not as a sum of severed aspects.
Thanks to Frank Harper for reading drafts of this
- 1 The
.aarlibrary extension is a pretty similar archive. The only difference being that the files are stored in a regular non-compiled jar/xml form. Resources and Java code are actually compiled at the very moment the Android application using them is built. - 2 There is just one optional exception to this rule: the launcher icon. The new Google experience launcher relies on the density “above” the current screen density to render the icon on the launcher. Thus, I always bundle an xxxhdpi version of this icon.
- 3 I personally consider this as a huge flaw in the Android wearable support library and decided not to use it. I couldn’t afford adding a 1.5MB Android Wear app to my 3.5MB Android app (especially knowing it is sent to devices probably not having a connected Android Wear device). As a solution, I re-implemented on my own the only interesting utilities.
Android: How to automatically generate Java code from layout file?
Normally there are three different ways to do this:
- at run time (via annotations per reflection)
- at compile time (via annotations or aspects)
- at development time (via code generators)
A good article to start is Clean Code in Android Applications.
Ad 1) Two solutions, see
- RoboGuice, see http://code.google.com/p/roboguice/
- AndJect, see https://github.com/ko5tik/andject
Ad 2) Android Annotations, see http://androidannotations.org/
Ad 3) Two solutions, see
- the lazy-android plugin as mentioned in this thread, see
http://marketplace.eclipse.org/content/lazy-android - MotoDev Studio (available as standalone and as eclipse plugin), see http://developer.motorola.com/docstools/motodevstudio/
Be a lazy but a productive android developer – Part 7 – Useful tools
http://www.technotalkative.com/lazy-android-part-7-useful-tools/
Android 布局优化
布局优化
--------
1. setContentView调用花费的时间取决于布局的复杂性:资源数据越大解析越慢,而更多的类也让布局实例化变慢
2. 调用setContentView()几乎占用了从onCreate()开始到onResume()结束之间所有时间的99%
3. 要节约时间,大多数基于同样的原则:减少创建对象的数量。消除不必要的对象,或者推迟创建对象
4. 采用嵌套的线性布局会深化布局层次,从而导致布局和按键处理变慢。
5. 合并布局。另一种减少布局层次的技巧是用<merge />标签来合并布局。
Android布局的父视图是一个FrameLayou,如果你的布局的最上层也是一个FrameLayout,就可以用<merge />标签代替它,减少一层布局
6. 重用布局,Android支持在XML布局中使用<include /> 标签,用来包含另一个布局。
<include /> 标签可用于两个目的:
1) 多次使用相同的布局
2) 布局有一个通用的组成部分,或有部分依赖于设置配置(例如,屏幕方向纵向或横向)
7. ViewStub
推迟初始化是个方便的技术,可以推迟实例化,提高性能,还可能会节省内存(如果对象从未创建过)
ViewStub是轻量级且不可见的视图,当需要时,在自己的布局中可以用它来推迟展开布局。
下次遇到相关代码后,将代码整理在这里
布局工具
--------
1. hierarchyviewer 用来查看布局的
2. layoutopt 用于检测布局文件质量的
基本界面控件
五、基本界面控件
大多数的界面控件都在android.view和android.widget包中,android.view.View为他们的父类,还有Dialog系列,android.app.Dialog为父类,等等。
Android的原生控件,一般是在res/layout下的 xml文件中声明。然后在Activity通过使用super.setContentView(R.layout.某布局layout文件名)来加载 layout。在Activity中获取控件的引用需要使用super.findViewById(R.id.控件的ID),接着就可以使用这个引用对控 件进行操作,例如添加监听,设置内容等。当然也可以通过代码动态的使用控件。
View子类结构图:

TextView子类结构:

ViewGroup子类结构图:

FrameLayout子类结构:

android.app.Dialog子类结构:

第一部分,基本控件
1.文本类:
http://limingnihao.iteye.com/blog/851386
TextView、EditText、AutoCompleteTextView、MultAutoCompletTextView 、(TextSwitcher) 、(DigitalClock)
ExtractEditText、CheckedTextView、Chronometer
2.按钮类:
http://limingnihao.iteye.com/blog/851396
Button、CheckBox、RadioButton(RadioGroup) 、ToggleButton 、(ImageButton )
CompoundButton
缩放按钮:
ZoomButton、ZoomControls
3.图片类:
http://limingnihao.iteye.com/blog/851408
ImageView、ZoomButton、ImageButton、(ImageSwitcher )
QuickContactBadge
4.时间控件:
http://limingnihao.iteye.com/blog/852493
DigitalClock、AnalogClock、TimePicker、DatePicker
5.进度显示:
http://limingnihao.iteye.com/blog/852498
ProgressBar、AbsSeekBar、SeekBar、RatingBar
6.导航:
TabHost、TabWidget。
7.视频媒体:
VideView、MediaController
8.Dialog对话框
CharacherPickerDialog、AlertDialog、DatePickerDialog、ProgressDialog、TimePickerDialog
第二部分,布局类
1.布局类:
AbsoluteLayout、LinearLayout、RadioGroup 、TableLayout、 TableRow、RelativeLayout、FrameLayout
2.需要适配器的布局类:
AdapterView、AbsListView、GridView、ListView、AbsSpinner、Gallery Spinner
3.滚动条:
HorizontalScrollView、ScrollView
第三部分,其他
网页:
WebView
动画:
ViewAimator、ViewFilpper、ViewSwitcher、ImageSwitcher、TextSwitcher
其他:
KeyboardView
SurfaceView(照相时会使用) GLSurfaceView
ViewStub DialerFilter TwolineListItem SlidingDrawer GestureOverlayView
其中:
ListView一般与ListActivity一一起使用。TabActivity: http://limingnihao.iteye.com/
TabHost、TabWidget一般与TabActivity一起使用。ListActivity: http://limingnihao.iteye.com/
setContentView
http://android-developers.blogspot.in/2009/03/android-layout-tricks-3-optimize-with.html
Android中visibility属性VISIBLE、INVISIBLE、GONE的区别
在Android开发中,大部分控件都有visibility这个属性,其属性有3个分别为“visible ”、“invisible”、“gone”。主要用来设置控制控件的显示和隐藏。有些人可能会疑惑Invisible和gone是有什么区别的???那 么,我们带着这个疑问看下面:
其在XML文件和Java代码中设置如下:
可见(visible)
XML文件:android:visibility=”visible”
Java代码:view.setVisibility(View.VISIBLE);
不可见(invisible)
XML文件:android:visibility=”invisible”
Java代码:view.setVisibility(View.INVISIBLE);
隐藏(GONE)
XML文件:android:visibility=”gone”
Java代码:view.setVisibility(View.GONE);
为了区别三者,我建了一个Dome进行演示,先上Dome的代码,演示后就知道它们的区别:
XML文件:
- <?xml version=“1.0” encoding=“utf-8”?>
- <LinearLayout xmlns:android=“http://schemas.android.com/apk/res/android”
- android:layout_width=“fill_parent”
- android:layout_height=“fill_parent”
- android:orientation=“vertical”>
- <LinearLayout
- android:layout_width=“fill_parent”
- android:layout_height=“wrap_content”
- android:orientation=“horizontal”
- android:layout_marginBottom=“20dip” >
- <TextView
- android:layout_width=“wrap_content”
- android:layout_height=“wrap_content”
- android:layout_weight=“1”
- android:background=“#F00”
- android:text=“TextView1”
- android:textSize=“23sp”
- android:visibility=“visible” />
- <TextView
- android:id=“@+id/mainTV2”
- android:layout_width=“wrap_content”
- android:layout_height=“wrap_content”
- android:layout_weight=“1”
- android:background=“#00F”
- android:text=“TextView2”
- android:textSize=“23sp”
- android:visibility=“visible” />
- </LinearLayout>
- <Button
- android:id=“@+id/mainBtn1”
- android:layout_width=“fill_parent”
- android:layout_height=“wrap_content”
- android:text=“TextView2为VISIBLE”
- android:onClick=“mianOnClickListener”/>
- <Button
- android:id=“@+id/mainBtn2”
- android:layout_width=“fill_parent”
- android:layout_height=“wrap_content”
- android:text=“TextView2为INVISIBLE”
- android:onClick=“mianOnClickListener”/>
- <Button
- android:id=“@+id/mainBtn3”
- android:layout_width=“fill_parent”
- android:layout_height=“wrap_content”
- android:text=“TextView2为GONE”
- android:onClick=“mianOnClickListener”/>
- </LinearLayout>
后面三个Button只要是控制TextView的visibility的属性
Java代码:
- package com.chindroid.visibility;
- import android.app.Activity;
- import android.os.Bundle;
- import android.view.View;
- import android.widget.TextView;
- public class MainActivity extends Activity {
- /** TextView2 */
- private TextView mainTV2 = null;
- @Override
- public void onCreate(Bundle savedInstanceState) {
- super.onCreate(savedInstanceState);
- setContentView(R.layout.main);
- //初始化数据
- initData();
- }
- /** 初始化控件的方法 */
- private void initData() {
- mainTV2 = (TextView)findViewById(R.id.mainTV2);
- }
- /**
- * MainActivity中响应按钮点击事件的方法
- *
- * @param v
- */
- public void mianOnClickListener(View v){
- switch (v.getId()){
- case R.id.mainBtn1:{ //按钮1的响应事件
- //设置TextView2可见
- mainTV2.setVisibility(View.VISIBLE);
- break;
- }
- case R.id.mainBtn2:{ //按钮2的响应事件
- //设置TextView2不可见
- mainTV2.setVisibility(View.INVISIBLE);
- break;
- }
- case R.id.mainBtn3:{ //按钮3的响应事件
- //设置TextView2隐藏
- mainTV2.setVisibility(View.GONE);
- break;
- }
- default:
- break;
- }
- }
- }
由于程序一启动两个TextView都是可见的

当我们点击第1个按钮,把TextView2visibility属性设置为INVISIBLE时,程序如下如下图所示:

当我们点击第3个按钮,把TextView2visibility属性设置为GONE时,程序如下如下图所示:

当我们再点击第1个按钮,把TextView2visibility属性设置为VISIBLE时,TextView2又呈现出来了,如下图所示:
由上面的演示可知
VISIBLE:设置控件可见
INVISIBLE:设置控件不可见
GONE:设置控件隐藏
而INVISIBLE和GONE的主要区别是:当控件visibility属性为INVISIBLE时,界面保留了view控件所占有的空间;而控件属性为GONE时,界面则不保留view控件所占有的空间。